What is a Case in Salesforce?
A Case in Salesforce is a record that tracks customer questions, issues, or requests. It’s used by customer service teams to organize, manage, and resolve issues effectively. Cases help support teams provide better customer service by keeping records of all interactions.
Latest Trends and Updates in Salesforce Case Management
| Feature | Description | Benefit |
|---|---|---|
| AI-Powered Case Support | Uses Einstein AI for automatic case categorization and response suggestions | Faster and more accurate agent responses |
| Omni-Channel Routing | Automatically routes cases based on issue priority and agent skills | Quicker case resolution, better assignment |
| Self-Service Portals | Customers can access portals to solve issues on their own before contacting support | Reduced workload for support agents |
| Milestone Tracking | Monitors each case’s progress with deadlines and alerts | Ensures SLAs are met and cases stay on track |
| Advanced Analytics | Enhanced dashboards and reports on case types, response times, and peak periods | Improves planning and proactive case handling |
Key Takeaways
- AI and automation are key to Salesforce’s recent updates, helping agents focus on complex issues.
- Omni-Channel Routing ensures that cases are handled by the best-suited agent.
- Self-service options empower customers, reducing reliance on support teams and saving time.
- Milestone Tracking and analytics help teams stay organized and improve customer experience through data insights.
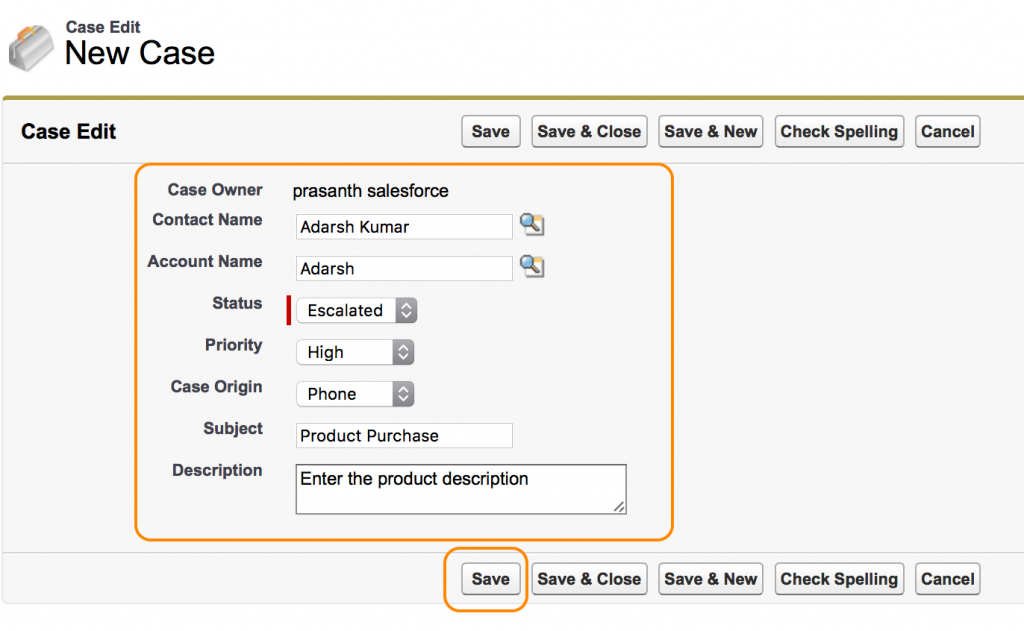
Steps to create a case in Salesforce?
Tutorial: Steps to Create a Case in Salesforce
Follow these steps to create a new case in Salesforce. This process helps you track customer requests, questions, or issues efficiently.
Step 1: Log In
- Log in to your Salesforce account by going to salesforce.com.
Step 2: Navigate to Cases
- Go to the Cases tab in your Salesforce interface. This tab is usually located in the main navigation bar.
Step 3: Start a New Case
- Click the “New” button to start creating a new case.
Step 4: Enter Case Details
- Fill out the case fields:
- Contact Name: Enter the customer’s contact name.
- Account Name: Link the case to an account if applicable.
- Status: Set the case status (e.g., New, In Progress, Closed).
- Priority: Choose a priority level (e.g., High, Medium, Low).
- Case Origin: Select how the case originated (e.g., Email, Phone, Web).
- Subject: Add a subject line that summarizes the case.
- Description: Provide a detailed description of the issue or request.
Step 5: Save the Case
- Choose a Save option:
- Save: Saves the case and keeps you on the same page.
- Save & Close: Saves the case and closes the current page.
- Save & New: Saves the current case and opens a new blank case form.
- Check Spelling: Checks for spelling errors before saving.
- Close: Discards the case if you decide not to save it.
Step 6: Optional – Cancel
- If you want to cancel without saving, click Cancel to discard the case.
What is a Web to Case Form?
Web to case forms are used to gather customers requests directly from company or organization website. Web to Case forms are similar to Web to lead Forms. By using web to case forms we can generate 50, 000 cases per day automatically.
- When Web to Case form is submitted salesforce.com runs field validation rules before creating any record.
- Rich text Area fields are not used in Web to Case forms because Rich Text Area fields are not supported by salesforce.com for web to case forms.
How to create Web to case Forms in Salesforce?
Creating Salesforce Web to Case Forms. Now we are going to create web to case forms in salesforce.com. Follow steps shown below.
- Go to Setup=>Customize=>Self-Service=>Web-to-Case.
