The <apex:dataTable> tag in Salesforce Visualforce is used to create tables that dynamically display a list of records or custom data sets in rows and columns. This tag provides a way to structure data neatly, allowing Salesforce developers to present data from lists, queries, or other collections directly on a Visualforce page. The <apex:dataTable> tag is commonly used for displaying lists of records, such as accounts, contacts, or custom objects, with each row representing an individual record.
Key Attributes of <apex:dataTable>
value: The collection of data you want to display in the table, usually a list returned from a controller or an extension.var: Represents each individual item (or record) in the collection for easy reference within the table row.rows: Limits the number of rows displayed on a single page.styleandstyleClass: Apply CSS styling to customize the appearance of the table.
Apex:dataTable Tag
Apex:dataTable Tag :-In our previous Salesforce Tutorial we have clearly learned about <apex:column> tag. In this Salesforce training Tutorial we are going to learn about apex:datatable tag and how it works in visualforce page.
<Apex:datatable>:- apex:datatable tag is create data tables in visualforce pages. Each item in the data table is displayed in the form of rows and columns.
Ex:- <apex:datatable value=”{!leads}” var=”le” width=”75%”>
Different attributes supported by <apex:datatable> tag.
| align | bgcolor | border | captioclass |
| columnClasses | columns | first | captionstyle |
| columnsWidth | dir | frame | cellpadding |
| Footerclass | id | lang | cellspacing |
| Headerclass | onclick | ondblclick | onkeydown |
| onkeypress | onkeyup | onmousedown | onmouseout |
| onmouseover | onmouseup | onmousemove | onRowClick |
| OnRowDblClick | onRowMousemove | onRowmouseOut | rendered |
| Onrowmousedown | onRowMouseOver | OnrowMouseUp | rowClasses |
| rows | rules | style | styleclass |
| title | var | width | value |
Let us see how apex:datatable tag works.
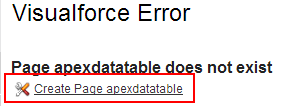
Create new Visualforce page as shown below.
Click on create page apexdatatable link to create new visualforce page.
Now write Visualforce page code as shown below.
The provided code snippet is a Visualforce page that displays a list of Lead records using the <apex:dataTable> tag. This setup shows how to structure data from the Lead object in a table format within a Visualforce page. Let’s break down each part of the code for clarity.
Code Breakdown
<apex:page standardController="Lead" recordSetVar="Leads">
    <apex:pageBlock title="APEX: Data Table demo">
        <apex:dataTable value="{!Leads}" var="le" width="75%">
            <apex:column value="{!le.Name}" headerValue="Name"/>
            <apex:column value="{!le.Phone}" headerValue="Phone"/>
            <apex:column value="{!le.Company}" headerValue="Company"/>
        </apex:dataTable>
    </apex:pageBlock>
</apex:page>
Explanation of Each Tag and Attribute
<apex:page standardController="Lead" recordSetVar="Leads">
standardController="Lead": This specifies that the page is using the standard controller for theLeadobject. This setup allows the page to perform standard CRUD (Create, Read, Update, Delete) operations onLeadrecords.recordSetVar="Leads":recordSetVarbinds a list ofLeadrecords to the variableLeads. This variable can be used to retrieve and display multipleLeadrecords within the Visualforce page.
<apex:pageBlock title="APEX: Data Table demo">
- The
<apex:pageBlock>component is used to create a structured section on the page. Thetitleattribute gives this block the title “APEX: Data Table demo.” - This provides a clean, organized look for displaying data, with the title appearing as a header for this section.
<apex:dataTable value="{!Leads}" var="le" width="75%">
<apex:dataTable>is used to display a list of records in a table format.value="{!Leads}": Binds the data table to theLeadsvariable, which contains a list ofLeadrecords.var="le": Defines the variableleto represent each individualLeadrecord in the list. This variable will be used to access the fields of eachLead.width="75%": Sets the width of the data table to 75% of the available page width, ensuring the table takes up a specific portion of the page for better presentation.
<apex:column value="{!le.Name}" headerValue="Name"/>
<apex:column>represents a single column in the data table.value="{!le.Name}": Displays theNamefield of eachLeadrecord.headerValue="Name": Sets the header label of this column to “Name.” This label appears at the top of the column.
- Additional Columns
<apex:column value="{!le.Phone}" headerValue="Phone"/>: Displays thePhonefield of eachLeadrecord, with the header label “Phone.”<apex:column value="{!le.Company}" headerValue="Company"/>: Displays theCompanyfield of eachLeadrecord, with the header label “Company.”
Summary of Functionality
- This Visualforce page uses a standard controller for the
Leadobject, allowing it to retrieve multipleLeadrecords and display them in a table. - The
<apex:dataTable>component organizes the data in a structured table format. - Each
<apex:column>represents a field from theLeadobject (Name,Phone,Company), making the data easy to read and interpret.
Key Benefits
- Structured Data Presentation: The use of
<apex:dataTable>allows for clean, structured presentation of multiple records. - Standard Controller Flexibility: Using the standard controller simplifies data handling and enables standard operations without custom code.
- Customization: Setting the table width and defining headers improves readability and allows for a more customized layout.
This setup is ideal for displaying a list of leads in a tabular format, making it easy for users to scan key information at a glance.
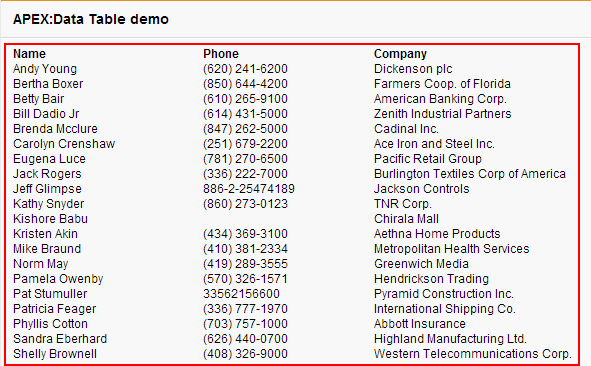
Here we creating datatable for standard object leads. We are inserting all record set variables of leads in to leads data table. Name, phone number and company are the three columns in data table. “Width” is the attribute to adjust width of data table.
Output:- apex:datatable tag


